Skip to content
Orqra
Browse documentation

Models

Configure and use your own models

Orqra uses the Provider connections you configure on this device. Complete these steps once, then choose an enabled, compatible model wherever a workflow needs it.

What you will complete

Set project defaults or choose a compatible enabled model on a processing node. Review Request Preview, then run only when the inputs, model, and parameters are correct.

In this guide

  1. 1
    Open Models — Open Models and choose the Provider connection you want to configure. You can use a supported Provider or a custom compatible endpoint.
  2. 2
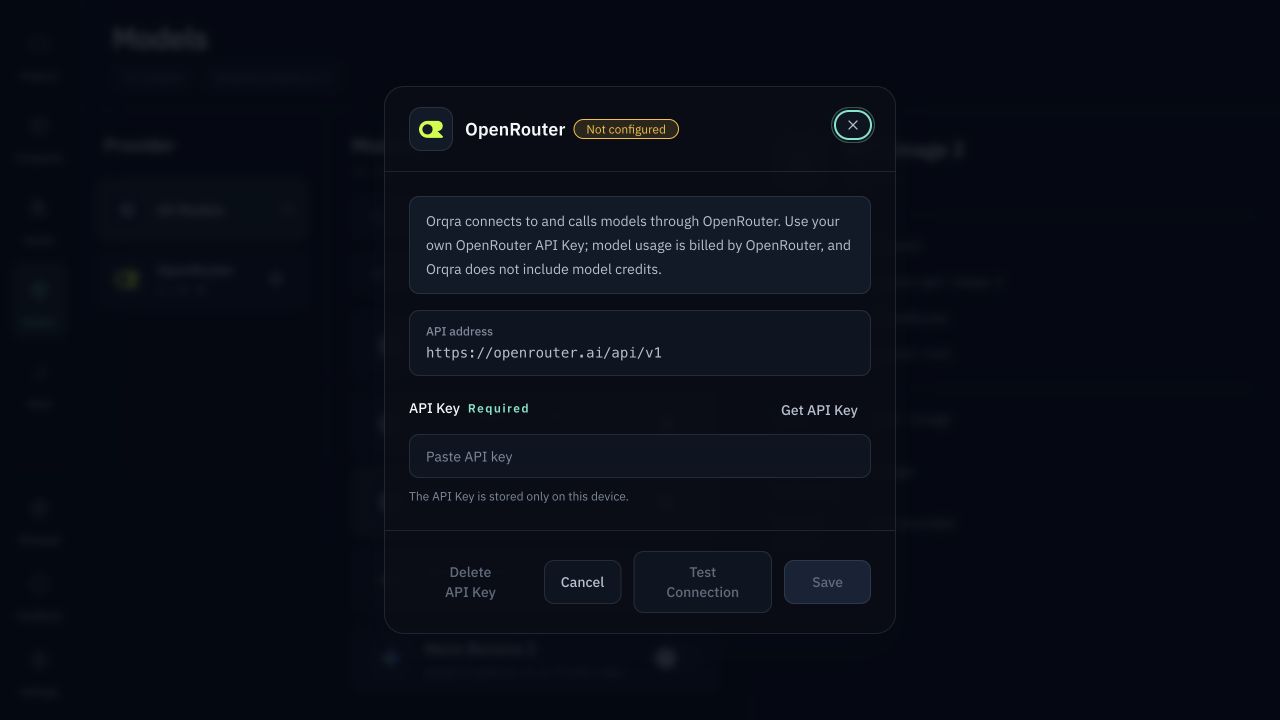
    Save credentials locally — Enter the API Key or Provider-specific credentials, then save. Save sensitive changes before testing or syncing models; a saved API Key is not displayed again.
  3. 3
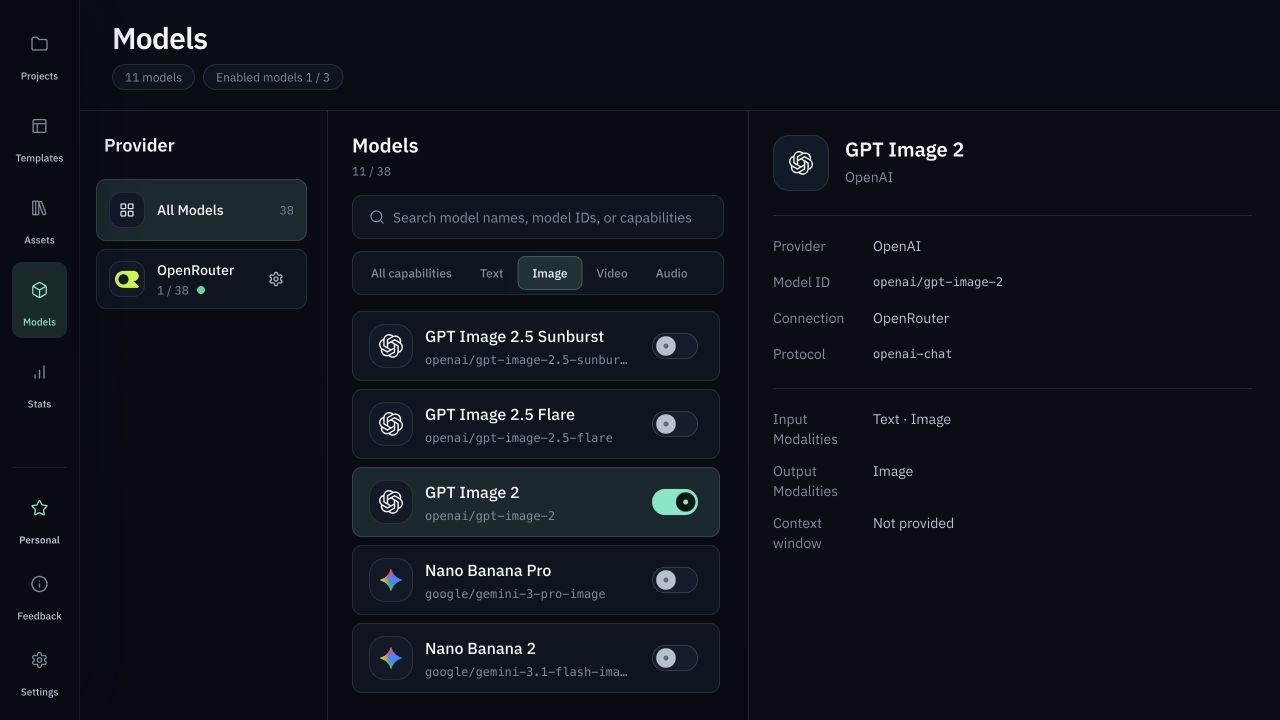
    Add and enable models — Add the models you need to My Models and enable them. Free supports up to 3 enabled models; Personal has no edition-level enabled-model limit.

Model and connection support

Separate the connection method, the API protocol, and the exact models verified by Orqra before choosing a model for a workflow.

OpenRouter connection

Connect with your own OpenRouter API key, sync its model catalog, and add models to My Models. Orqra does not provide or resell model credits.

OpenAI-compatible API

Connect a third-party service, gateway, or self-hosted endpoint with a custom Base URL. Orqra supports Chat Completions at /chat/completions and Responses at /responses; actual compatibility depends on the endpoint implementation.

Models verified by Orqra

These exact OpenRouter model IDs have completed Orqra capability adaptation and real-call verification for the documented v1 support scope.

CapabilityModelExact model ID
TextGPT-5.6 Solopenai/gpt-5.6-sol
TextGPT-5.6 Lunaopenai/gpt-5.6-luna
TextClaude Opus 5anthropic/claude-opus-5
TextClaude Sonnet 5anthropic/claude-sonnet-5
TextGemini 3.6 Flashgoogle/gemini-3.6-flash
TextGemini 3.5 Flash Litegoogle/gemini-3.5-flash-lite
TextKimi K3moonshotai/kimi-k3
TextKimi K2.5moonshotai/kimi-k2.5
TextDeepSeek V4 Prodeepseek/deepseek-v4-pro
TextDeepSeek V4 Flashdeepseek/deepseek-v4-flash
ImageNano Banana Progoogle/gemini-3-pro-image
ImageNano Banana 2google/gemini-3.1-flash-image
ImageGPT Image 2openai/gpt-image-2
VideoVeo 3.1google/veo-3.1
VideoVeo 3.1 Fastgoogle/veo-3.1-fast
VideoSeedance 2.0bytedance/seedance-2.0
VideoSeedance 2.0 Fastbytedance/seedance-2.0-fast
Orqra uses the Provider connections you configure on this device. Complete these steps once, then choose an enabled, compatible model wherever a workflow needs it.
Configure and use your own modelsSet project defaults or choose a compatible enabled model on a processing node. Review Request Preview, then run only when the inputs, model, and parameters are correct.
Add the models you need to My Models and enable them. Free supports up to 3 enabled models; Personal has no edition-level enabled-model limit.
Add and enable modelsThe models you need appear in My Models and the required models are enabled.

Before you start

  • Your API Key is stored locally. Never send it to Orqra support or enter it on the Orqra website.
  • Use the endpoint and credential format documented by your Provider or custom gateway.
  • Model availability, capabilities, rate limits, and fees are controlled by the Provider. Orqra does not include AI credits.

Complete the task

  1. 1

    Models

    Open Models

    Open Models and choose the Provider connection you want to configure. You can use a supported Provider or a custom compatible endpoint.

    Expected result

    The Models page shows the connection you want to configure.

  2. 2

    Service Connections

    Configure the connection

    Confirm the Provider type and required connection fields. Change the Base URL only when the Provider or your own gateway requires it.

    Expected result

    The Provider type, Base URL when required, and Provider-specific fields match your Provider account.

  3. 3

    Save

    Save credentials locally

    Enter the API Key or Provider-specific credentials, then save. Save sensitive changes before testing or syncing models; a saved API Key is not displayed again.

    Expected result

    The connection is saved locally and the saved API Key value is no longer displayed.

  4. 4

    Test Connection / Sync Models

    Test and sync

    Use Test Connection, then Sync Models to refresh the available list. These actions contact the Provider, but they do not run a generation request.

    Expected result

    The connection result is visible and the Provider model list has been refreshed.

  5. 5

    My Models

    Add and enable models

    Add the models you need to My Models and enable them. Free supports up to 3 enabled models; Personal has no edition-level enabled-model limit.

    Expected result

    The models you need appear in My Models and the required models are enabled.

  6. 6

    Project / Processing node

    Choose, review, and run

    Set project defaults or choose a compatible enabled model on a processing node. Review Request Preview, then run only when the inputs, model, and parameters are correct.

    Expected result

    A compatible enabled model is selectable as a project default or on the processing node.

Checks before you retry

  • Use the endpoint and credential format documented by your Provider or custom gateway.
  • Support can explain Orqra BYOK setup fields, but Orqra does not include AI model API credits and does not resell third-party AI APIs. Provider API keys, billing, rate limits, and model availability remain with your own provider.
  • Add the models you need to My Models and enable them. Free supports up to 3 enabled models; Personal has no edition-level enabled-model limit.